
Post: VFD controller and Raspberry PI - Text on VFD screen
Let’s do quick recap of what we know now:
- PT6315 is used to control the VFD display.
- SPI protocol is used.
- VFD display should be powered on by waking up power source.
- +3.3V must be supplied by setting
HIGHonpin 1of front panel connector.
Reverse engineering segment data of VFD display
Segment data format
In order to display meaningful data on VFD display we need to understand how to send data to it.
Page 16, Figure 15 of PT6315 datasheet describes how to send data to VFD controller.
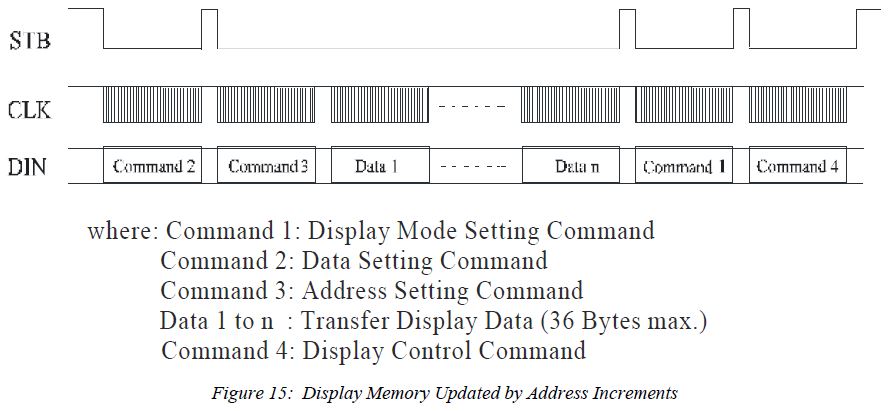
It’s important to note that multiple data can be send to controller at once.
Upon checking docs of SPI library for Python, we can find that it supports sending multiple bytes of data at once. We just have to supply list of values to xfer or xfre2 method. Difference between those two methods is that xfer2 will hold CS (chip select) active between blocks.
xfer(list of values[, speed_hz, delay_usec, bits_per_word])
Segment grid assignment
Segment grid assignment can be found on page 88 of DVD 27 service manual.
However I was not able to correlate the documented grid mapping during testing. So I have to do some reverse engineering per segment.
Here is a segment info I was able to gather during testing.
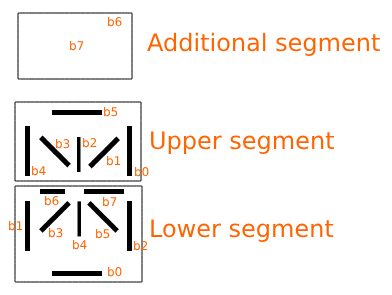
- Every segment is represented by 3 bytes of data.
- Because I will not use any of additional information on VFD display, I will use only 2 bytes of data:
Upper segmentshares the same byte withAdditional segment. - Segments are mapped from right to left; corresponding bit shown on a picture above.
- If you want to illuminate any of the segments, you have to set corresponding bit to
1. - If you want to turn off any of the segments, you have to set corresponding bit to
0🙂.
That give us the following segment grid assignment:
Grid assignment map
The following code was converted to Python from my local C++ project. It might be not really optimal, but should be good enough for training purposes, right? 😉
# Grid assignment map - PT6315

class TwoBytes:
    def __init__(self, byte1, byte2):
        self.byte1 = byte1
        self.byte2 = byte2

ascii_map = {
    ' ': TwoBytes(0b00000000, 0b00000000),
    'A': TwoBytes(0b00110001, 0b11000110),
    'B': TwoBytes(0b00100101, 0b10010101),
    'C': TwoBytes(0b00110000, 0b00000011),
    'D': TwoBytes(0b00100101, 0b00010101),
    'E': TwoBytes(0b00110000, 0b11000011),
    'F': TwoBytes(0b00110000, 0b11000010),
    'G': TwoBytes(0b00110000, 0b10000111),
    'H': TwoBytes(0b00010001, 0b11000110),
    'I': TwoBytes(0b00100100, 0b00010001),
    'J': TwoBytes(0b00000001, 0b00000111),
    'K': TwoBytes(0b00010010, 0b01100010),
    'L': TwoBytes(0b00010000, 0b00000011),
    'M': TwoBytes(0b00011011, 0b00000110),
    'N': TwoBytes(0b00011001, 0b00100110),
    'O': TwoBytes(0b00110001, 0b00000111),
    'P': TwoBytes(0b00110001, 0b11000010),
    'Q': TwoBytes(0b00110001, 0b00100111),
    'R': TwoBytes(0b00110001, 0b11100010),
    'S': TwoBytes(0b00110000, 0b11000101),
    'T': TwoBytes(0b00110101, 0b00010001),
    'U': TwoBytes(0b00010001, 0b00000111),
    'V': TwoBytes(0b00010010, 0b00001010),
    'W': TwoBytes(0b00010001, 0b00101110),
    'X': TwoBytes(0b00001010, 0b00101000),
    'Y': TwoBytes(0b00001010, 0b00010000),
    'Z': TwoBytes(0b00100010, 0b11001001),

    '1': TwoBytes(0b00000011, 0b00000100),
    '2': TwoBytes(0b00100001, 0b11000011),
    '3': TwoBytes(0b00100001, 0b11000101),
    '4': TwoBytes(0b00010001, 0b11000100),
    '5': TwoBytes(0b00110000, 0b11000101),
    '6': TwoBytes(0b00110000, 0b11000111),
    '7': TwoBytes(0b00100001, 0b00000100),
    '8': TwoBytes(0b00110001, 0b11000111),
    '9': TwoBytes(0b00110001, 0b11000101),
    '0': TwoBytes(0b00110011, 0b00001111),

    '+': TwoBytes(0b00000100, 0b11010000),
    '-': TwoBytes(0b00000000, 0b11000000),
    '/': TwoBytes(0b00000010, 0b00001000),
    '*': TwoBytes(0b00001110, 0b00111000),
    '\'': TwoBytes(0b00000100, 0b00000000),
    '"': TwoBytes(0b00000100, 0b00000000),
    '.': TwoBytes(0b00000000, 0b01000000),
    '(': TwoBytes(0b00001000, 0b00000000),
    ')': TwoBytes(0b00000010, 0b00000000),
    ':': TwoBytes(0b00000010, 0b00001000),
}
You then can access segment data by using ascii_map dictionary.
For example for letter A:
>>> ascii_map['A'].byte1
49
>>> ascii_map['A'].byte2
198
Displaying LOADING on screen
Let’s combine code from the previous post, with mapping from above.
Grid testing
import spidev

# invert binary
def msb_to_lsb(msb_value):
    return int(bin(msb_value)[2:].zfill(8)[::-1], 2)

class TwoBytes:
    def __init__(self, byte1, byte2):
        self.byte1 = byte1
        self.byte2 = byte2

ascii_map = {
    ' ': TwoBytes(0b00000000, 0b00000000),
    'A': TwoBytes(0b00110001, 0b11000110),
    'B': TwoBytes(0b00100101, 0b10010101),
    'C': TwoBytes(0b00110000, 0b00000011),
    'D': TwoBytes(0b00100101, 0b00010101),
    'E': TwoBytes(0b00110000, 0b11000011),
    'F': TwoBytes(0b00110000, 0b11000010),
    'G': TwoBytes(0b00110000, 0b10000111),
    'H': TwoBytes(0b00010001, 0b11000110),
    'I': TwoBytes(0b00100100, 0b00010001),
    'J': TwoBytes(0b00000001, 0b00000111),
    'K': TwoBytes(0b00010010, 0b01100010),
    'L': TwoBytes(0b00010000, 0b00000011),
    'M': TwoBytes(0b00011011, 0b00000110),
    'N': TwoBytes(0b00011001, 0b00100110),
    'O': TwoBytes(0b00110001, 0b00000111),
    'P': TwoBytes(0b00110001, 0b11000010),
    'Q': TwoBytes(0b00110001, 0b00100111),
    'R': TwoBytes(0b00110001, 0b11100010),
    'S': TwoBytes(0b00110000, 0b11000101),
    'T': TwoBytes(0b00110101, 0b00010001),
    'U': TwoBytes(0b00010001, 0b00000111),
    'V': TwoBytes(0b00010010, 0b00001010),
    'W': TwoBytes(0b00010001, 0b00101110),
    'X': TwoBytes(0b00001010, 0b00101000),
    'Y': TwoBytes(0b00001010, 0b00010000),
    'Z': TwoBytes(0b00100010, 0b11001001),

    '1': TwoBytes(0b00000011, 0b00000100),
    '2': TwoBytes(0b00100001, 0b11000011),
    '3': TwoBytes(0b00100001, 0b11000101),
    '4': TwoBytes(0b00010001, 0b11000100),
    '5': TwoBytes(0b00110000, 0b11000101),
    '6': TwoBytes(0b00110000, 0b11000111),
    '7': TwoBytes(0b00100001, 0b00000100),
    '8': TwoBytes(0b00110001, 0b11000111),
    '9': TwoBytes(0b00110001, 0b11000101),
    '0': TwoBytes(0b00110011, 0b00001111),

    '+': TwoBytes(0b00000100, 0b11010000),
    '-': TwoBytes(0b00000000, 0b11000000),
    '/': TwoBytes(0b00000010, 0b00001000),
    '*': TwoBytes(0b00001110, 0b00111000),
    '\'': TwoBytes(0b00000100, 0b00000000),
    '"': TwoBytes(0b00000100, 0b00000000),
    '.': TwoBytes(0b00000000, 0b01000000),
    '(': TwoBytes(0b00001000, 0b00000000),
    ')': TwoBytes(0b00000010, 0b00000000),
    ':': TwoBytes(0b00000010, 0b00001000),
}

bus=0
device=0

spi = spidev.SpiDev()
spi.open(bus, device)
spi.max_speed_hz = 500000
spi.mode = 0b00

# Turn off display
spi.xfer([msb_to_lsb(0b10000111)])

# Clear RAM
for i in range(0xFF):
    spi.xfer2([msb_to_lsb(0b11000000 + i), 0x00,0x00])

# command 1 - 10 digits 18 segments
spi.xfer([msb_to_lsb(0b00000110)])

# command 2
# "Normal operation mode"
# "Increment address after data has been written"
# "Write data to display mode"
spi.xfer([msb_to_lsb(0b01000000)])

# command 4 turn on display
spi.xfer([msb_to_lsb(0b10001111)])

# Display `LOADING`
payload = list()

# [::-1] - reverse string to match segment grid assignment (right to left)
for i in "LOADING"[::-1]:
  payload.append(msb_to_lsb(0b11000000))
  payload.append(msb_to_lsb(ascii_map[i].byte2))
  payload.append(msb_to_lsb(ascii_map[i].byte1))

# Performs an SPI transaction. Chip-select should be held active between blocks.
spi.xfer2(payload)
Upload snippet above to the Raspberry and execute it in python shell.
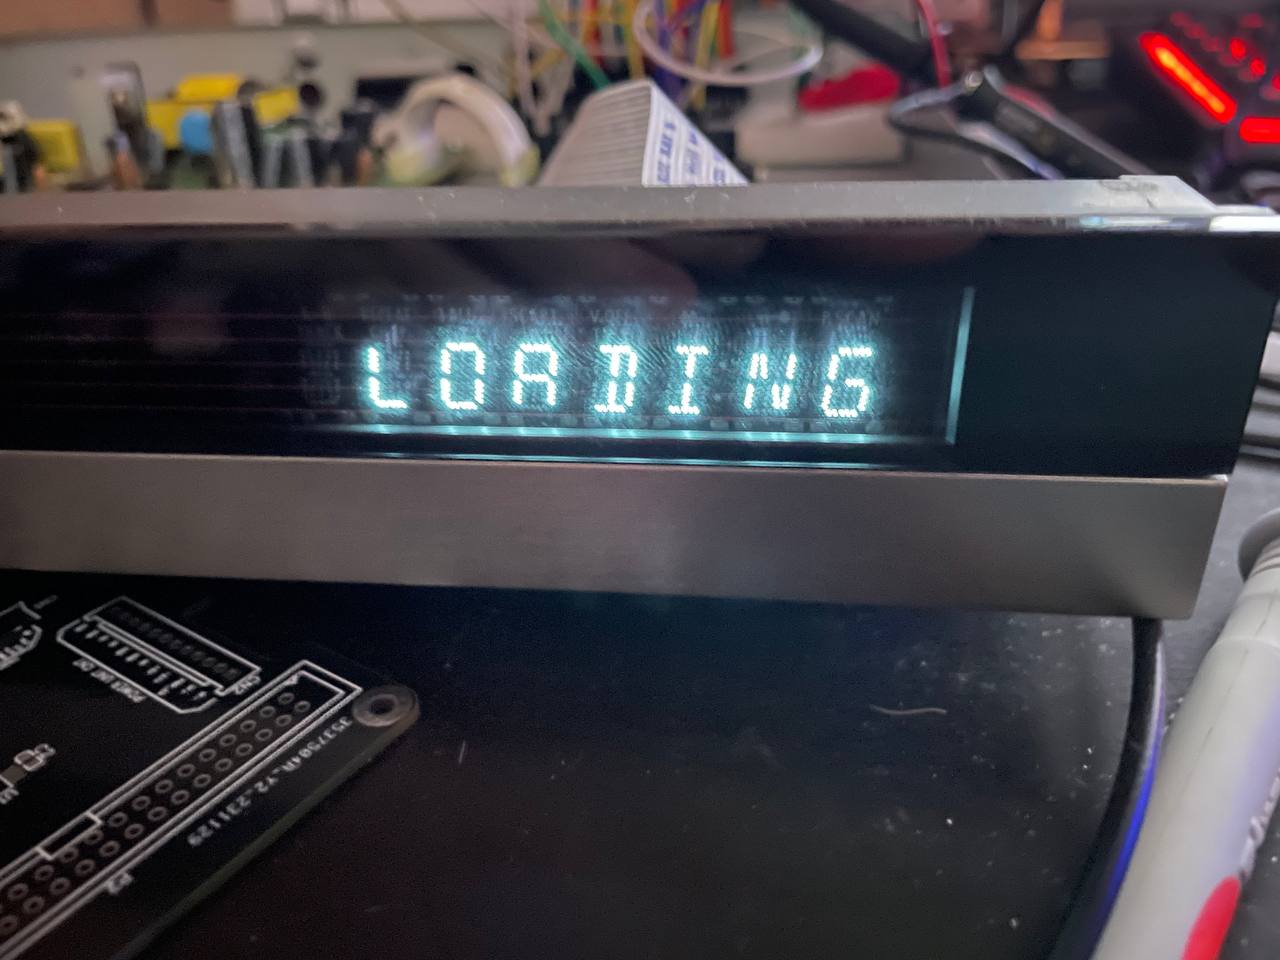 Result of the snippet above.
🎉 Our display now can show any string we want 🙂
Comments